Are you ready for some basic chord action? We know we are. Last week we showed you how to play a D chord. This time we’re introducing its little brother: D minor. Grab your guitar and read on for further instructions.
Being a beginning guitarist means you’re going to enter a world of fun, action and, sometimes, pain. Pressing down strings isn’t something your fingers are used to, so check out this blog for some tips on how to prevent blisters. Okay, let’s keep our eyes on the price. Pick up your guitar and prepare for some D-minor action.
https://youtu.be/3THlPHYoVto
Step 1 – Tune your guitar
As always, the first step is getting your guitar in tune. You just can’t miss this step. For a standard tuning, use a tuner or an application like KARANG.
Step 2 – Take a look at the Dm diagram
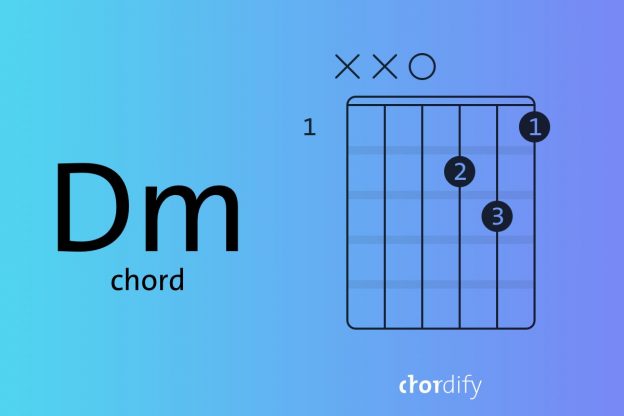
To learn a chord, you have to know where to position your fingers on the fretboard. Now this is not something you have to figure out all on your own. Just take a look at the chord diagram of the Dm and you’ll find every bit of information you need. Check it out below.

The picture displays part of the fretboard. The vertical lines from left to right are the strings E, A, D, G, B, e (strings are counted from bottom to top, so the high e is the first string and the low E the sixth). The transparent circles lining the top indicate the open strings. The number 1 indicates the location of the chord; in this case the first fret.
Step 3 – Position your fingers
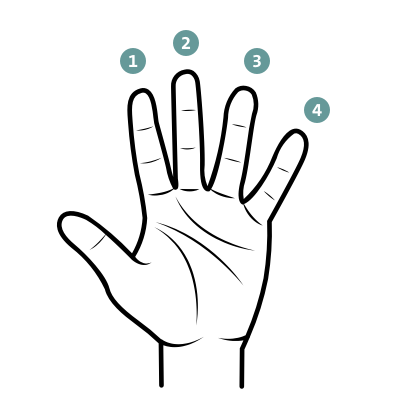
The position of your fingers is shown by the numbers in the thick black circles. Check out the picture below: 1 indicates your index finger, 2 your middle finger, 3 your ring finger, and 4 your little finger. Now it’s time to grab that guitar and put this theory to work.
As you can see, you have to position your middle finger on the second fret of the third string (the G string). Your index finger goes to the first fret of the first string (the E string). The Dm chord is complete when your ring finger is on the third fret of the second string (the B string).
Ready, steady? Yeah? Strum that Dm chord, starting from the D string! Congrats, you’ve just added the Dm to your basic chord repertoire.
Step 4 (bonus) – A bit of music theory
Playing the Dm feels good, doesn’t it? We’ve reached a crossroads now, and the big question is: what’s your next move rockstar? Can’t wait another minute to start jamming to songs in Dm? Go ahead. Or, if you curious, you can read on to understand the theory underlying the Dm chord. Don’t sweat it, this isn’t a trick question and there’s no right or wrong answer. So, what’s it going to be?
Ah yes, you’re still here. Great! Ready or not, here is some music theory. Each basic chord we discuss consists of a number of basic elements: the root, the third note (third), the fifth note (fifth), and the eighth note (octave).
The octave and the root are the same note, but they differ in pitch. The fifth provides the power in the triad by supporting it harmonically. The third indicates whether a chord is major or minor. This says something about the mood that the chord sets — major often sounds cheerful and minor sounds a little sadder.
Step 5 (bonus) – Dm scale
Why do we give the notes within a chord these strange numbers? Well, that’s because they come from the scale of the relevant key. For example, the Dm scale consist of D (1), E (2), F (3), G (4), A (5), Bb (6), C (7) and D (8). See the numbers behind the notes? The 1 is the root, the 3 is the third, the 5 is your fifth and the 8 is the root played at a higher pitch, the octave.
Take another look at the Dm chord diagram. Which notes do you actually use from the scale? You strum a D, an A, a D and an F — so root, fifth, octave and third. Makes sense, right? Read our blog post about more complex chord constructions to find out more about this. Now, forget all that theoretical mumbo jumbo for a moment. Here are some tracks in Dm to practice your skills. Happy jamming!

