Knowing the basic chords is important, but in this series we’ll get to know the wondrous world of the barre chords. We’ve written some blogs on this topic already. But now it’s time to unpack the barre chords step by step. Are you sitting comfortably? Today we’ll explain the Bm chord in three simple steps.
Estimated reading time: 5 minutes
In this blog post
Step 1 – Tune your guitar
It’s important to tune your instrument before you start jamming. To tune your guitar in standard tuning with our tips & tricks blog post, you can also use an analog tuner. But what if the batteries are empty and you don’t have any new ones lying around. In that case, just use a tuning app like KARANG, or a tuning video like the one below.
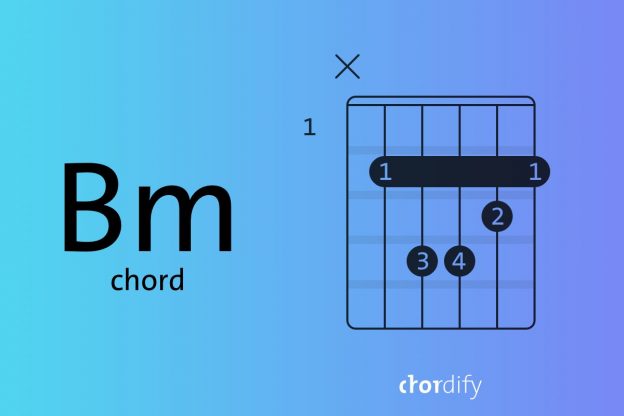
Step 2 – The Bm chord diagram
Let’s take a look at the chord diagram for Bm. In the upper left-hand corner, you’ll spot a number that tells you which fret you’re starting from. In this case we’re at the bottom of the neck, almost close to the nut. Your index finger is located on the second fret. But what does it do? It plays the barre! Let us explain to you what barre means.

Barre is the technique of playing the guitar when we press several strings on the same fret with one finger. This finger can be index, middle, ring, pinky finger. The index finger is most commonly used. So in the chord diagram the black bar with the number 1 tells you to use your index finger (1) to barre the strings. The rest of the numbers indicate your other fingers. Have a look at the visualization to see the numbering of the fingers.

Step 3 – Play the Bm chord
Okay, time for some action. Position your fingers as indicated by the chord diagram. Use your index finger to press down the strings, on the second fret, from the A string to the high e string. After that, position your middle finger on the third fret B string (second string).
Your ring and pinky finger are cuddled up together on the fourth fret. The ring finger presses down the D string (fourth string) and the pinky the G string (third string). Everything in position? All right. Now strum down from the A string. Sounds nice, right?
Step 4 (bonus) – Mind blowing advantage to know the Bm chord
You’ve just learned how to play a Bm chord. Excellent! If you’re looking for some tunes, we have a blog about songs written in Bm. If you’re eager to learn a bit of music theory explaining the chord we’ve just learned, read on. Ah, you’re still here! Engaged and willing to learn, we like it. Prepare yourself for some quick theory. This stuff is explained more thoroughly in another blog, but for now, here’s the quick version.
Why does this chord have the name Bm? Remember that each chord has a root – it’s the main note of the chord with which we usually begin to play this chord. Often the root is located on our bass strings: 6th, 5th, 4th string. In this chord we start our barre from the 5th string on 2nd fret. And this is exactly the position, where the B note is located on the 5th string.
Give it a good ring again and listen how this chord sounds. Right, it has a kind of sad, melancholic vibe. Taking everything into account, the name Bm stands for: firstly, our root is B; secondly, it’s a “sad” chord – therefore we add the letter “m” for minor.
Step 5 (bonus) – Great news! The Bm figure is the gateway
If you know the shape of the Bm chord and you know all the notes which are located on the 5th string, you can explore as many minor chords as the length of your fretboard! Impressed?! Let us explain the secret. For instance, on the 3rd fret of the 5th string we have the note C. Now, if you move your Bm shape one fret up, you’ll get a Cm chord! It’s that easy.
Step 6 (bonus) – The Bm scale
Are you still following all this? Don’t worry if your head starts to spin a bit. That’s normal. You’re probably wondering where all these numbers and notes are coming from. Let us explain. The starting point is always the scale of a root note. In the case of the Bm, the scale consists of a B (root), C# (second), D (third), E (fourth), F# (fifth), G (sixth), A (seventh), and B (octave).
Now keep this in mind and have another look at the chord diagram. What notes are you hitting? As we can see, the B is the first one you hit; followed by an F# on the fourth string (the fifth); a B on the third string (this is the octave); a D on the second string; and another F# on the first string – the high e.
Can you connect the dots between theory and practice? Indeed, the core notes are all there: the root B, the third D, and the fifth F#. It makes a lot more sense this way, right? Theory doesn’t have to be that hard. Enjoy your new skill and happy jamming!

