You know what time it is? Yup, it’s the moment you realize it’s time to learn a basic chord in three simple steps! In previous blogs we explained how to play chords like A, Am, E, Em, D, and Dm. In this post we focus on the C chord.
Grab your guitar so you can try out the stuff that you’re reading about. Remember that learning to play this instrument isn’t always a walk in the park. It could even be a bit painful when your fingers start hurting from pressing down the strings. Before we move on to step one, please read these tips to help you with your sore finger problem.
Step 1 – Tune your guitar
As always the first step is… did I hear you mumble “tuning your guitar”? If so, you are totally right. Both professional players and beginners can’t do without a well-tuned instrument. For a standard tuning you can use a tuner, or an application for your phone like KARANG.
Step 2 – Check out the C chord diagram
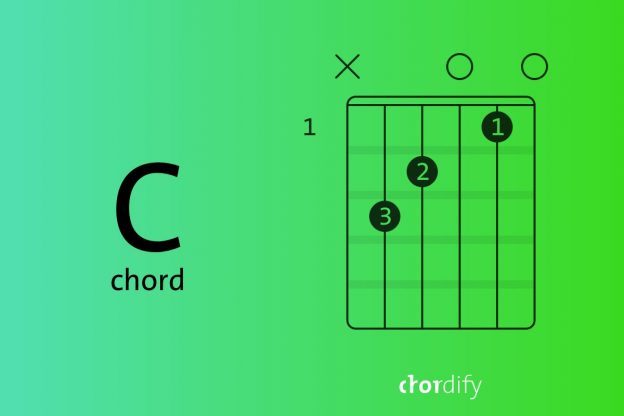
The next step is visualizing the chord we’re going to play. No worries, this step is pretty simple. We have a chord diagram that you have to understand – and preferably memorize. The picture below shows a part of the guitar neck. The vertical lines from left to right are the strings E, A, D, G, B, e (strings are counted from bottom to top, so the high e is the first string and the low E the sixth)

C chord diagram
You can also see transparent circles at the top. These indicate the strings that you have to play open (without pressing them down). The number 1 indicates the fret on which the chord is located, after all it’s always good to know where to work on the guitar neck. In this case the C chord is located at the top of the fretboard.
Step 3 – Position your fingers
The numbers in the thick black circles show the position of your fingers. We made a picture that lightens the load: 1 indicates your index finger, 2 your middle finger, 3 your ring finger, and 4 your little finger. Well, that wasn’t that bad right? Are you ready to play something?
Take another look at the C chord diagram. It’s time to position your index finger on the first fret of the second string (the B string). Your middle finger goes to the second fret of the fourth string (the D string). Placing your ring finger on the third fret of the fifth string (the A string) is the final step in playing the C chord.
All fingers set? Now strum all the strings starting from the A string. Now that’s the sound of summer, spring and everything in between? Oh yeah, now you can add C to your musical vocabulary.
Step 4 (bonus) – Do you want to know why a C chord is played as it is?
Are you proud of yourself? I know we are! So now that you know how to play a C chord, the big question is: do you want to jam or are you still in for some more music theory? Not a trick question, whatever you choose, it’s all good.
You’re still here! I am truly impressed. I hope you can hold on to something, because here comes the theory roller coaster. Each basic chord consists of a number of basic elements: the root, the third note (third), the fifth note (fifth) and the eighth note (octave).
The octave and the root are the same tone, only they differ in pitch. The fifth is said to provide the power in the triad by supporting it harmonically. The third indicates whether a chord is major or minor. This says something about a chord’s mood – major often sounds cheerful and minor sounds sad or melancholic.
Step 5 (bonus) – The scale of C
Where do the numbers, first, fifth, and eight come from? ? Well, that’s because these tones come from the scale of the corresponding key. For example, the scale of C is made up of C (1), D (2), E (3), F (4), G (5), A (6), B (7) and C (8). Take note of the numbers behind the tones. The 1 is the root, the 3 is the third, the 5 is your fifth and the 8 is the root played higher, which we also call the octave.
Now take another look at the C chord diagram. Which tones do you actually use from the scale? You strum C, E, G, and C again – so root, third, fifth, and octave. Makes sense, right? For more complex chord constructions see this blog post. Do you find this theory section hard to wrap your head around? No worries. Here are some cool tracks to go crazy on. Happy jamming!
Did you enjoy this article? Stay tuned because next week we’re publishing “How to play an D chord in three simple steps“.

