As you look at your recent purchase, you realize it’s a dream come true: a shiny new guitar. Hmm, but now what? Don’t worry, Chordify will help you with your first steps into a world that might forever change your whole perception of what music is. But let’s start at the beginning: how to play an E chord.
Why an E chord? Because this is the most basic chord on your guitar. It’s also a starting point for a lot of melodies and common chord progressions on guitar. This is determined by the standard tuning, of most guitars, in E. Follow the steps below to get started.
Estimated reading time: 6 minutes
In this article about the E chord you’ll find:
Step 1 – Tune your guitar in E
E is the standard tuning for guitars. And tuning to E can be easily done with a tuner app such as KARANG, or an analog tuner. If these options aren’t possible, check out our blog post on tips & tricks for tuning your guitar.
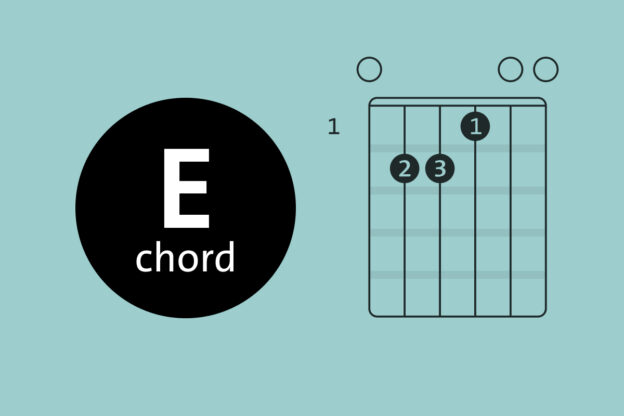
Step 2 – The E major chord diagram
What is an E chord? Its shape is depicted in the chord diagram below. If you know how to play an Em chord we have good news for you – you’re almost ready to play the E chord. Just make an Em chord shape and press the 3rd string on the first fret with your index (first) finger.
If you haven’t checked out the Em chord yet, no worries, keep reading. Let’s take a look at the diagram – from left to right, we see the low E, the A, the D, the G, the B and the high E. (Note: strings are counted from the bottom up, so the high E is the first string, and the low E is the sixth). The numbered black dots show the finger positions for this chord.

The transparent circles at the top of the diagram show which strings are played “open,” without pressing them. The number “1” in the top left-hand corner indicates the fret. This is crucial for your orientation on the guitar. In this case, you play an E chord at the very top of the neck, on the first fret.
Step 3 – Placing your fingers in the right position
The fingers you use to play the E chord are also indicated in the chord diagram. These are the numbers in the thick black dots. All you have to know is: 1 signifies your index finger, 2 your middle finger, 3 your ring finger and 4 your pinky. So, with that in mind, it’s now time to take out your guitar and start counting down the numbers.

Put your ring finger on the second fret of the fourth string (the D string). Is it in the right position? Good, now continue by placing your middle finger on the second fret of the fifth string (the A string). Press down on the strings.
And now for the last piece of the puzzle. Put your index finger on the first fret of the third string (the G string). Are all the fingers in place? That’s it. Press down as hard as you can, and give all the strings a strum.
Basic arpeggios and strumming patterns for the right hand
Now we can place an E chord on the guitar fretboard. Feels good, doesn’t it? However you might ask: “All right, but what about the right hand, which strings shall I play or strum for that chord?” We are happy to hear this question! Remember, a chord can sound weird, even when it’s properly placed, if we pluck or strum the wrong strings in the right hand.
Here are two examples of arpeggios (we usually use this in more lyrical songs) and strumming (for more dynamic songs) for the E chord.
Arpeggio
An arpeggio is the technique of playing notes from a chord one after another. It’s always important to start with the tonic note (also known as the root note) of the chord. It’s usually located on one of the bass strings and it has the same letter as the chord name.
In the Em chord article, we already mentioned that both the Em and E chord have the same root note – E, the sixth open string. So, let’s start with that string. Then we’ll play the 3rd, 2nd and 1st strings.

We’ll play these four strings in sequence: 6th, 3rd, 2nd and 1st. See how this is displayed in the note charts and tablature below – keep in mind that the thickest string is indicated by the bottom line in the tablature.

As you can see, we play almost all the strings as open strings except for the 3rd string, which we press on the first fret.
We’ve also Chordified this video for you, so you can jam along and play an E chord with us.
Strumming
Here we are with the most commonly associated guitar technique. Let’s learn how to strum the E chord.
For the E chord, we strum all six strings, three of which are open. And again we should start with the root note, which is the open 6th string. We will alternately play downstrokes and upstrokes – “downstroke” means from the 6th (thickest) string to the 1st (thinnest) string, and “upstroke” means the other way around. On the tablature below, we indicate it with arrows facing up or down.
Don’t be confused – the thickest string is indicated by the bottom line in the tablature. Therefore, “downstroke” is the arrow facing up and “upstroke” – the arrow facing down.

We’ve Chordified this video for you, so you can jam along and play an E chord with us.
Give yourself some rest and practice the basics for now.
List of songs for practicing playing an E chord
At this moment, you probably can’t wait to start jamming an E chord with real songs. Here is a list of songs containing an E chord:
Satisfaction – The Rolling Stones
Bob Marley – Three Little Birds
Enjoy and Happy Jamming!

