It’s time to boost your knowledge about chords and add new skills to your toolbox. Gear up because today we’re going to teach you how to play a B chord in three simple steps.
Estimated reading time: 7 minutes
In this blog about the B chord you’ll find
- Introduction
- Step 1 – Tune your guitar
- Step 2 – Check out the B chord diagram
- Step 2a – The B chord diagram part II
- Step 3 – Position your fingers
- Step 3a – Position your fingers part II
- Step 4 (bonus) – Theory behind the B chord
- Step 4a (bonus) – Theory behind the B chord part II
- Step 5 (bonus) – The scale of B
Introduction
The B chord is a so-called barre chord. If you’re interested in basic barre chord theory, just check out our blog post on how to play 12 chords using one basic figure. If your fingers start to hurt, give yourself a break, read up on how to prevent painful fingers during guitar playing, and go at it again.
Step 1 – Tune your guitar
Back to today’s topic: How to play a B chord. The first thing you (always) have to do before starting any jam is tuning that axe because there’s nothing worse than an out-of-tune instrument. You can use a regular tuner or an application on your phone like KARANG. You can also check out our blog post on tips & tricks for tuning your guitar. Or just use our tuning video to tune your axe by ear.
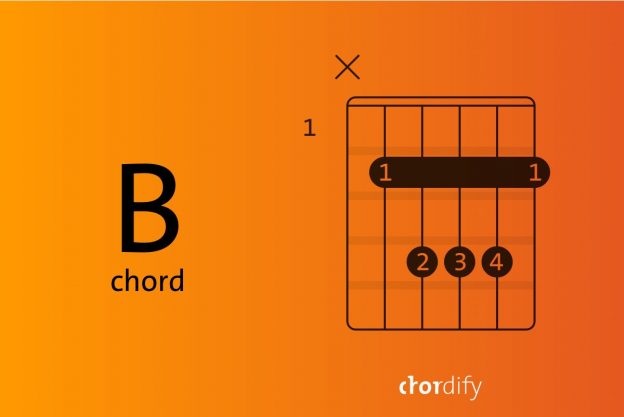
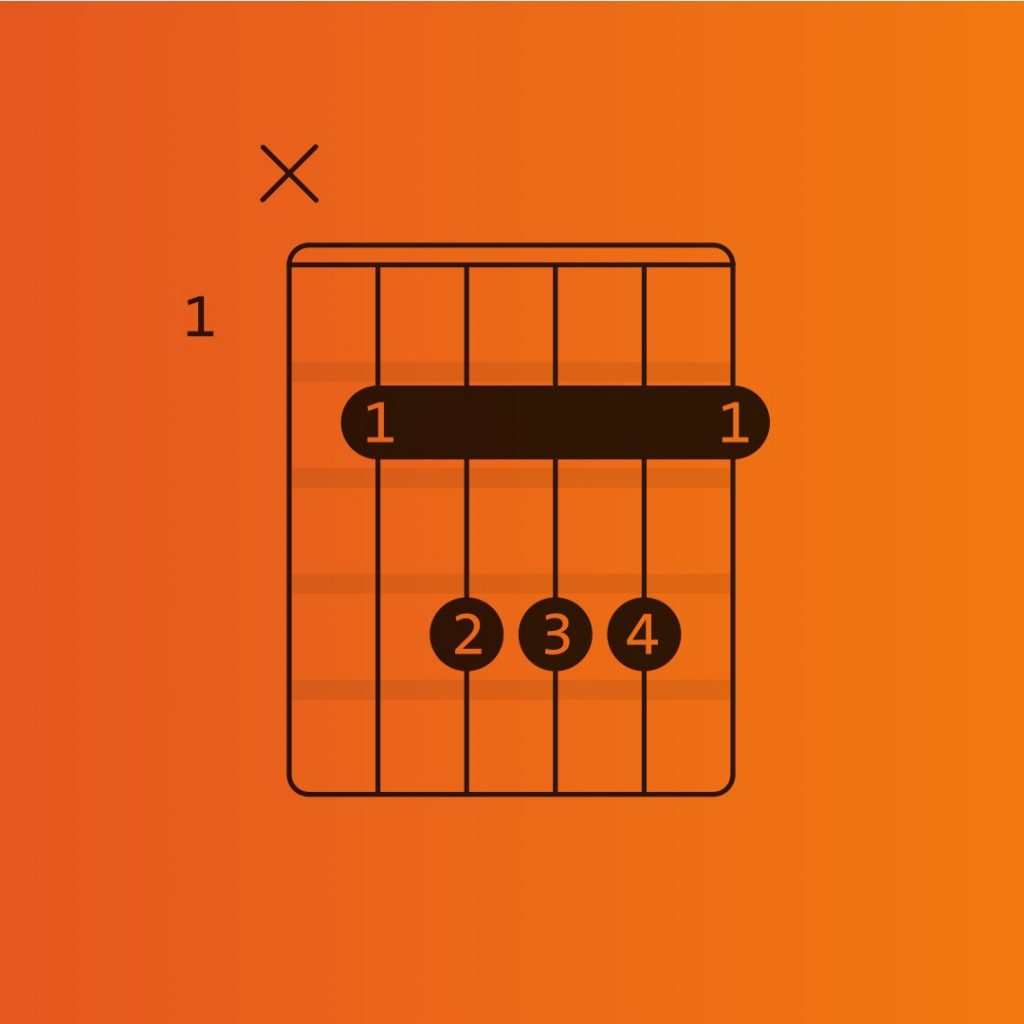
Step 2 – Check out the B chord diagram
So, let’s give you a hand in deciphering the diagram below. It’s important to know that the high e is the 1st string on your guitar. Pop quiz: If the high e is the 1st string, which one is the 5th? Yes, the A string. Now that this musical string theory’s out of the way, here’s another thing you should know. The numbers in the black circles on the chord diagram refer to the fingers that you’re using to play the B chord.
In the picture below, you can see how the numbers correspond to your fingers. Second pop quiz: What finger does the 1 (in the black area) refer to? Yup, that’s your index finger. And yes, in this case, it has to press down on all the strings from the A downwards. Simple right?
Step 2a – The B chord diagram part II
In the upper left-hand corner, you see another digit (not in a blackened area). This one stands for the fret that is at the top of the diagram. In this case, it’s a 1, which refers to the first fret. As you can see, the barre is positioned on the second fret. And you’re probably wondering what that little x means on top of the diagram. Well, that’s simple. An x means a muted string. The opposite of the x is the o, which stands for … well guess. Yes, strumming an open string.
To understand and remember the B chord better, take a look at the position of your second, third and fourth finger. Looks familiar, doesn’t it? Right, it is the same shape as the A chord, but located on the fourth fret. Do you recall from which string we start strumming the A chord? Exactly, from the 5th string. This isn’t any different for the B chord, only now we press the 5th string with a barre grip. So keep the A chord figure in mind, it will help you finding and playing the B chord on the correct string – the 5th string in our case.
Step 3 – Position your fingers
Grab your guitar. It’s time to bring these written words to life. Start positioning your fingers as pointed out on the chord diagram. This means barring all strings from the 5th string down, on the second fret.
The second step is simple. Place your middle finger, ring finger and pinky on the D, G and B string on the fourth fret, right next to each other. If you’ve never done this before, it will definitely feel like a weird acrobatic move. As you keep on practicing, this figure will start to feel more natural in time. Now give those strings a ring!
Step 3a – Position your fingers part II
The second step if is even easier if you keep in mind the shape of the A chord. Imagine, that you’re building an A chord on the fourth fret by using your second, third, and fourth finger – your first finger is already busy with covering the barre. If you’ve never done this before, it will definitely feel like a weird acrobatic move. Treat it like a stretching exercise for your fingers.
Finger this chord with your left hand (or right hand in case of left handed) again and again, until your fingers get used to the form. Here’s a tip: try helping the hand that has to press down the strings get into the right position by using your other hand. Once you get the hang of the figure just practice it over and over again without strumming the chord. The main focus is to strengthen your grip and finger flexibility.

Step 4 (bonus) – Theory behind the B chord
Congratulations on your new skill! Now you’re officially capable of playing a B chord. It doesn’t matter if it sounds kind of crappy. Your fingers have to get used to the positions, which will get better in time and with practice. If you can’t wait to start practicing, go ahead and check out some songs written in the key of B. But if you’re curious about why you play this chord the way you just learned it, stick around and we’ll explain it to you.
Ahaa! Someone is still reading. Very well indeed. So, buckle up young Padawan because here is a crash course in basic chord theory. The important elements of the chords are: root, third (the third note), and fifth (the fifth note). Our B chord consists of only these three notes. That’s why we also refer to this chord as a B triad.
Step 4a (bonus) – Theory behind the B chord part II
“Wait a minute! Three notes? But we’re strumming five strings, right?” Good question. Yes, we play five strings – five notes, but only three of them are different. On these five strings we play the root and the fifth twice. These repeat in different octaves. Therefore, the roots and the fifths have different pitches. You still with us? Good. Let’s dive a little bit deeper.
The root is the main note of the chord, it generates the symbol of the chord. We need to know the root to build up the triad. Usually in songs we start to play the certain chord from its root. The third is responsible for the “mood” of the chord. So it can be a happy “major”, or a sad “minor”. The fifth is the body of the chord. It is an important element to finish building a triad. The fifth brings “power” to our chord.
Step 5 (bonus) – The scale of B
Are you still following this? You sure? Because if you’re not, no worries. It’s a crash course and the important thing is that you can play the B chord; which you already can so the rest of this blog post is a bonus. That said, here’s some more theory to make your head spin: The B chord is constructed from notes in the B scale. Let’s take a closer look at this scale: B (root), C# (second), D# (third), E (fourth), F# (fifth), G# (sixth), A# (seventh), B (octave).
Simply put, we built our B chord, taking the root, third and fifth from the B scale. This is the skeleton of the B chord. Now we can add any other notes from the scale to this skeleton. For instance, we can add a second or a fourth to spice it up. Imagine how many interesting combinations we can get? Yup, a lot. Of course doing this requires you to know the B scale on the fretboard well. But this is the topic of a whole other article. For now focus on what you have learned about the B chord and enjoy. Happy jamming!

